Create an Allowance Package
The base of the Pharmaship inventory system is contained in an Allowance.
An allowance is:
a list of Molecule
a list of Equipment
different required quantities
The simplest way to create an Allowance is to use Django Admin pages.
To start the admin pages :
python manage.py runserver
If necessary, create administration user credentials using the following command:
python manage.py createsuperuser
Then, access the administration page using any graphical webbrowser : http://127.0.0.1:8000/admin
Create the Allowance object
Access the creation form: http://127.0.0.1:8000/admin/inventory/allowance/add/
Fill up the form with your values.
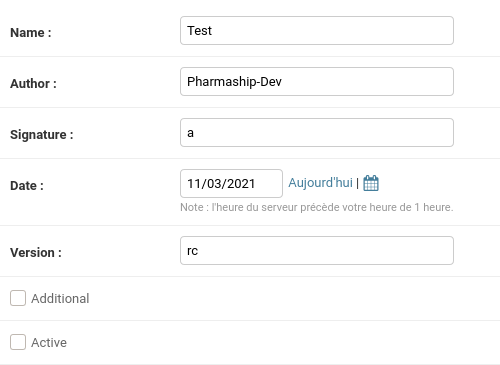
Signature must not be empty, using any value for now.
Additional checkbox allows you to tell Pharmaship that any required
quantity is added.
Example :
You already have an item with a required quantity of 50.
The new required quantity is 100.
With additional ticked, total required quantity is 150. Without, it is only 100.
The next step is to create differente Molecule and Equipment objects.
Create a Molecule object
Access the creation form: http://127.0.0.1:8000/admin/inventory/molecule/add/
Fill up the form with your values.

Roa means “Route of Administration”.
Tag is not yet used.Create an Equipment object
Access the creation form: http://127.0.0.1:8000/admin/inventory/equipment/add/
Fill up the form with your values.
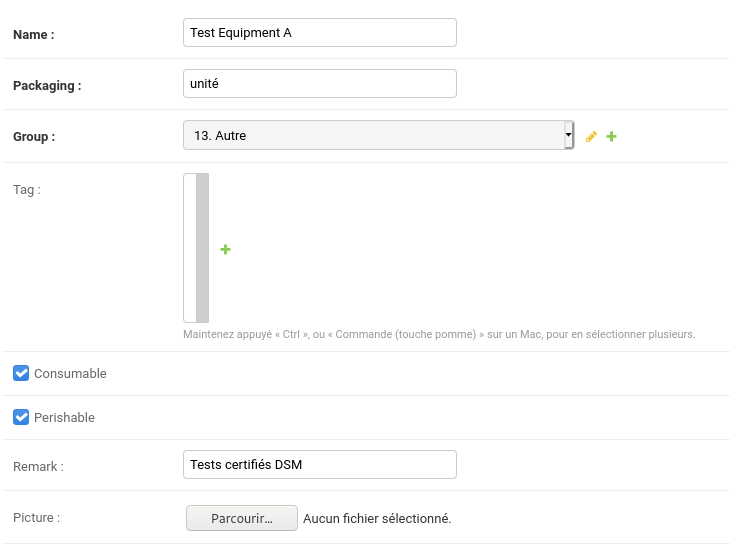
Consumable means the article related to this equipment will be able
to be “used”.
Perishable means the article related to this equipment must be
provided with an expiry date.
Picture field allows you to add an helpful picture of the equipment to ease
inventory process for the non-initiated user and avoid any confusion.
Tag is not yet used.Create the required quantity objects
Now that you have an Allowance, few Molecule and Equipment objects,
you need to add required quantity information.
They are handled in different classes:
MoleculeReqQtyfor main medicine inventory;EquipmentReqQtyfor main medical equipment inventory;RescueBagReqQtyfor rescue bags inventory;FirstAidKitReqQtyfor the first aid kits inventories;LaboratoryReqQtyfor laboratory inventory if applicable;TelemedicalReqQtyfor telemedical kit inventory if applicable.
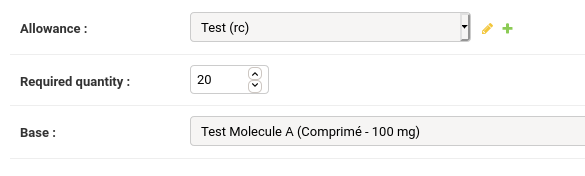
For each, the behaviour of the creation form is the same for MoleculeReqQty,
EquipmentReqQty, LaboratoryReqQty and TelemedicalReqQty:
Select the Allowance in the dropdown list
Input the required quantity
Select the base object (ie: a Molecule object)
URL for required quantity creation:
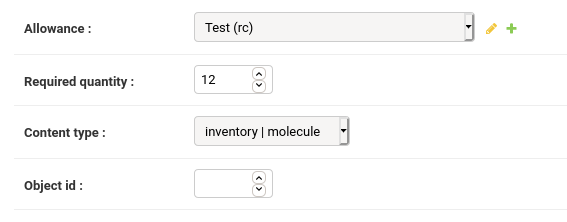
For RescueBagReqQty and FirstAidKitReqQty, the process is a little bit
different as you can refer to both molecule and equipment objects:
Select the Allowance in the dropdown list
Input the required quantity
Select the type of the base object (molecule or equipment)
Input the ID of the base object.
The ID can be found in the list page or in the link of an object. In example: http://127.0.0.1:8000/admin/inventory/equipment/ 139
Note
RescueBagReqQtyis applicable for the whole rescue bags (whatever you have one or two or more rescue bags). The articles and medicines are linked to a rescue bag through their location in the main inventory.FirstAidKitReqQtyis applicable for each first aid kit. It means if you have 10 first aid kits, then the required quantity is multiplied 10 times.
URL for required quantity creation:
Export the allowance files
You need to know the ID of your allowance.
First run the following command and record the desired allowance ID:
python manage.py export list
You should get a similar output::
INFO Allowances in database:
INFO [ID]  NAME (VERSION)
INFO [00]  Orphan (1)
INFO [01]  Dotation A - 25 marins (12.0b)
INFO [03]  GSMU (2018)
INFO [04]  Marlink Telemed (0.1)
INFO [05]  POCramé (0.1)
INFO [08]  Test (rc)
Then run the following command::
python manage.py export allowance id <ID> <my_package_filename.tar>
The exported package is a tar archive.
The tar file should contain the following architecture::
- /
  - MANIFEST
  - package.yaml
  - inventory/
    - allowance.yaml
    - equipment_obj.yaml
    - equipment_reqqty.json
    - first_aid_kit_reqqty.json
    - laboratory_reqqty.json
    - molecule_obj.yaml
    - molecule_reqqty.json
    - rescue_bag_reqqty.json
    - telemediacal_reqqty.json
  - pictures/ (if any)
    - (all your pictures with slug-name)
Sign the allowance package
The Pharmaship archive comes with a dedicated script which barely sign the
package with armor (gpg -s -a ...) and output a .asc file.
bin/pharmaship-sign <my_package_filename.tar>
Note
You must import your GPG signing private key first. See GPG man page.
The GPG “homedir” in the
pharmaship-signscript is thebinfolder.
Deploy your package
Your .asc file is ready to be sent to the Pharmaship users
(see import procedure)… provided you already deployed your public key.